One rainy afternoon, I was tackling a home renovation project, slicing through drywall with my trusty retractable utility knife. Suddenly, the blade refused to retract, leaving me frustrated and slightly nervous about the exposed edge. After inspecting it, I realized the spring inside had worn out. Determined to fix it myself, I dove into the process of replacing the spring, uncovering a surprisingly simple solution that saved my tool and my project. This experience inspired me to share a detailed guide on how to replace the spring in a retractable utility knife to help you revive your tool. Whether you’re a DIY enthusiast or a professional, a malfunctioning knife can halt your work. In this 2000-word blog post, I’ll walk you through replacing the spring in a retractable utility knife with clear steps, practical tips, and safety advice. By the end, you’ll feel confident fixing your tool and extending its lifespan. Let’s get started!
Why a Retractable Utility Knife Spring Fails
Utility knives are workhorses, but their springs endure constant tension, leading to wear over time. The spring controls the blade’s retraction, ensuring safety and functionality. When it weakens or breaks, the blade may stick or fail to retract, posing risks. According to a 2023 study by the Occupational Safety and Health Administration (OSHA), improper tool maintenance contributes to 15% of workplace injuries involving hand tools. A faulty spring is a common culprit. Springs can fail due to overuse, corrosion from moisture, or poor-quality materials in budget knives.
WORKPRO Premium Utility Knife Quick Change Blade Razor Knife, with 10 Extra Blades

![]()
My knife, a mid-range model, succumbed after two years of heavy use. Recognizing the signs—sluggish retraction or a loose blade—helps you address the issue early. Replacing the spring is often more cost-effective than buying a new knife, saving you money and reducing waste. Plus, it’s a straightforward task with the right approach. Before diving in, gather the necessary tools and understand your knife’s design to ensure a smooth repair process.
4-Pack Tough Folding Box Cutter. Razor Sharp Blade, Comfortable Handle, with Extra 10-Piece Blades,

![]()
Tools and Materials You’ll Need
Preparation is key to a successful spring replacement. Having the right tools and materials ensures efficiency and safety. Here’s what you’ll need:
- Small screwdriver set: For removing screws holding the knife together.
- Replacement spring: Match the size and type to your knife’s model.
- Tweezers: For handling small parts like springs.
- Work gloves: To protect your hands from sharp edges.
- Clean cloth: To wipe down components and maintain a clear workspace.
- Safety glasses: To shield your eyes from debris.
INTERNET’S BEST Premium Utility Knife Set

![]()
I learned the hard way that using the wrong screwdriver size can strip screws, so invest in a quality set. Check your knife’s manual or the manufacturer’s website for the correct spring specifications. For example, Stanley and Milwaukee knives often use specific spring sizes, available online or at hardware stores. Lay out your tools on a clean, well-lit surface to avoid losing tiny parts. With everything ready, you’re set to disassemble the knife safely.
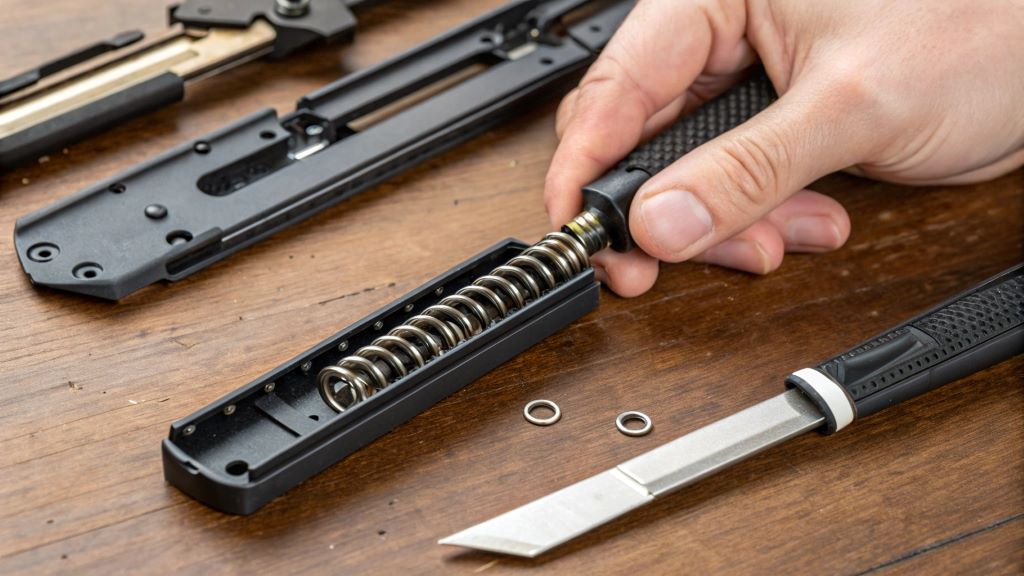
Step-by-Step Guide to Replacing the Spring
Replacing the spring in a retractable utility knife is a manageable task if you follow these steps carefully. Here’s how to do it:
- Disassemble the Knife: Use a screwdriver to remove the screws securing the knife’s casing. Place screws in a small container to avoid losing them. Gently separate the halves, exposing the internal mechanism.
- Locate the Spring: Identify the spring, usually a small coil near the blade slider. Note its position and attachment points for reassembly.
- Remove the Old Spring: Use tweezers to carefully unhook and remove the worn spring. Watch for tension to avoid injury.
- Install the New Spring: Position the replacement spring in the same orientation as the old one. Hook it securely using tweezers.
- Reassemble the Knife: Align the casing halves, ensuring the blade and slider move smoothly. Tighten the screws firmly but avoid overtightening.
- Test the Knife: Slide the blade in and out to confirm the spring works. Adjust if necessary.
During my repair, I struggled with the tiny spring’s tension, but patience and tweezers saved the day. Always work slowly to avoid damaging parts. If the blade doesn’t retract smoothly, double-check the spring’s alignment.
DIYSELF 16-Piece Craft Knife Set

![]()
Safety Tips for a Risk-Free Repair
Safety is paramount when working with sharp tools. A 2022 report by the Consumer Product Safety Commission noted that utility knife injuries account for over 100,000 emergency room visits annually in the U.S., often due to improper handling. Protect yourself with these tips:
- Wear protective gear: Gloves and safety glasses prevent cuts and eye injuries.
- Work in a stable environment: Use a flat, non-slip surface to keep parts secure.
- Handle the blade carefully: Remove the blade before repair if possible, or keep it retracted.
- Avoid distractions: Focus on the task to prevent slips or mistakes.
I once rushed a repair and nearly nicked my finger, a reminder to stay cautious. Keep your workspace free of clutter and ensure good lighting. If the knife feels unstable during testing, stop and reassess.
REXBETI 12-Pack Utility Knife

![]()
Common Mistakes to Avoid

Even simple repairs can go wrong without proper care. Here are common pitfalls and how to dodge them:
- Using the wrong spring: Mismatched springs cause poor performance. Always verify compatibility.
- Stripping screws: Apply steady pressure with the correct screwdriver size.
- Misaligning parts: Reassemble carefully to ensure the slider and blade function properly.
- Ignoring cleanliness: Dust or debris can jam the mechanism. Wipe parts with a clean cloth.
Amazon Basics Folding Utility Knife, Lightweight Aluminum Body with Holster

![]()
My first attempt failed because I used a generic spring, resulting in a sticky blade. After ordering the correct part, the knife worked perfectly. Take your time to align components during reassembly, as haste can lead to misalignment. Double-check each step to avoid rework. If you’re new to repairs, watch a tutorial video for visual guidance. Avoiding these mistakes saves time and ensures a functional knife.
When to Replace vs. Repair Your Knife
Sometimes, replacing the spring isn’t enough, and a new knife is the better choice. Consider these factors:
- Extent of damage: If the casing or slider is cracked, repair may be temporary.
- Cost comparison: Springs cost $2–$5, while a new knife ranges from $10–$30.
- Frequency of use: Heavy users benefit from durable, high-quality models.
- Age of the knife: Older knives may have obsolete parts, making repairs challenging.
My knife was worth saving due to its sturdy build, but a cheap model might not be. If repairs exceed 50% of a new knife’s cost, replacement is often wiser. Research durable options from brands like DeWalt or Craftsman for long-term value. Weigh your needs and budget before deciding. A well-maintained knife can last years, but knowing when to upgrade prevents frustration.
Why Ceramic Utility Blades Last Longer: The Ultimate Guide to Cutting-Edge Durability
REXBETI 2-Pack Utility Knife, SK5 Heavy Duty

Conclusion
Replacing the spring in a retractable utility knife is a rewarding task that saves money and boosts confidence. My journey from a stuck blade to a fully functional tool taught me the value of patience and preparation. By following the steps outlined—gathering tools, working safely, and avoiding common mistakes—you can revive your knife and keep your projects on track. This simple repair not only extends your tool’s life but also reduces waste, aligning with sustainable DIY practices. Whether you’re a seasoned crafter or a beginner, mastering this skill empowers you to tackle future repairs with ease. Try it yourself, and share your experience in the comments below! Did this guide help you fix your knife? Spread the word by sharing this article with fellow DIY enthusiasts. Your feedback fuels our mission to deliver practical, trustworthy advice.
FAQs
Why does my utility knife’s blade not retract properly?
A worn or broken spring is often the cause, preventing proper tension. Replace the spring to restore functionality.
Can I use any spring for my utility knife?
No, the spring must match your knife’s model. Check the manual or manufacturer’s website for specifications.
How long does it take to replace a utility knife spring?
With the right tools, the process takes 10–15 minutes. Take your time to ensure accuracy.
Is it safe to repair a utility knife at home?
Yes, if you follow safety precautions like wearing gloves, using proper tools, and working in a stable environment.
When should I replace my utility knife instead of repairing it?
Replace it if the knife is heavily damaged, repairs are costly, or parts are obsolete.
Read More:


