
Choosing the right crimping copper pipe tool can make or break your plumbing project. A poor choice leads to leaks, wasted time, and costly repairs. A good one, however, gives you tight, reliable connections that last for decades.
Whether you are a professional plumber or a confident DIYer, selecting the correct tool matters. There are many options on the market, and not all of them are equal. Therefore, it helps to understand what to look for before you buy.
This guide will walk you through everything you need to know. From the types of crimping tools to the key features that separate good tools from great ones, you will find clear and practical advice here.
What Is a Crimping Copper Pipe Tool?
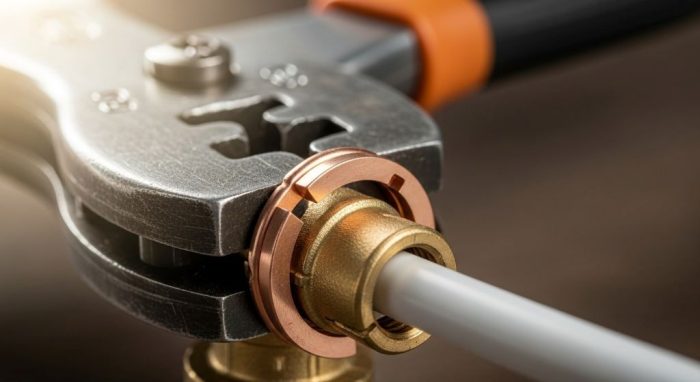
A crimping copper pipe tool is a device that joins copper pipes and fittings together. It works by squeezing a metal ring, called a crimp ring, tightly over a fitting. This creates a strong, watertight seal without the need for soldering or open flames.
The method is known as press-fit or crimp-fit plumbing. It is fast, clean, and very effective. Additionally, it is safe to use in tight or hard-to-reach spaces where a torch would be dangerous or impractical.
Crimping tools come in manual, ratcheting, and battery-powered versions. Each type suits different situations and skill levels. Understanding these differences is your first step toward the right purchase.
Types of Crimping Tools for Copper Pipes
Manual Crimping Tools
Manual crimping tools are the most basic option. You squeeze the handles together by hand to compress the crimp ring. These tools are lightweight and affordable. However, they require more physical effort, especially on larger pipe sizes. They work best for occasional, small-scale plumbing jobs.
Ratcheting Crimping Tools
Ratcheting tools use a ratchet mechanism to build compression gradually. You squeeze the handles in stages, and the ratchet locks in place with each squeeze. This design reduces fatigue and gives you more consistent results. Therefore, ratcheting tools are a popular choice for both professionals and serious DIYers.
Battery-Powered Crimping Tools
Battery-powered or cordless crimping tools are the most advanced option. They do most of the work for you. Simply position the tool and press a button. These tools are ideal for high-volume jobs and reduce operator fatigue significantly. Additionally, they provide extremely consistent crimp pressure every time. The main drawback is their higher cost.
Key Features to Look for in a Crimping Tool
Not every crimping tool is built the same. Certain features directly affect performance, safety, and longevity. Here are the most important ones to consider.
Jaw Compatibility and Size Range
Always check whether the tool accepts interchangeable jaws. Copper pipes come in different diameters. The most common sizes are 3/8 inch, 1/2 inch, 3/4 inch, and 1 inch. A tool with swappable jaws saves money because you do not need a separate tool for each size. Therefore, look for a model with a wide range of compatible jaw sizes.
Crimp Standard Compatibility
There are two main crimping standards: ASTM F1807, also known as the copper ring standard, and ASTM F2080, the cold expansion standard. Most general-purpose crimping tools follow the F1807 standard. However, you should verify that your tool and your fittings use the same standard. Mixing standards leads to failed connections.
Build Quality and Material
The tool body should be made from hardened steel or high-grade aluminum. Cheap plastic components wear out quickly and can fail under pressure. Look for tools with a solid, well-finished construction. Additionally, check that the pivot points are sturdy and smooth-moving.
Go/No-Go Gauge Included
A go/no-go gauge is a small inspection tool. It checks whether your crimp was done correctly after completion. Some crimping tool kits include one. This feature is very helpful, especially if you are new to crimp plumbing. It removes guesswork and gives you confidence in your work.
Ergonomics and Handle Design
Plumbing often means working in cramped or awkward positions. Therefore, the handle design of your crimping tool matters more than you might think. Look for cushioned grips and handles that do not spread too wide when open. A tool that fits comfortably in your hand will reduce fatigue and give you better control.
Matching the Tool to Your Project
The right tool depends on the scope and type of your project. A small bathroom repair calls for a different tool than a full home re-pipe. Consider the following scenarios to help you decide.
- For small repairs or occasional jobs: A basic manual or ratcheting tool will serve you well. Choose one with at least two or three jaw sizes to cover common pipe diameters.
- For medium-sized renovation projects: A ratcheting tool with a full set of jaw sizes is the best value. It balances performance with cost.
- For professional or high-volume work: Invest in a battery-powered crimping tool. The speed and consistency will save you time and reduce physical strain over a full workday.
- For new construction: Look for tools that work with press-fit fittings from major brands, as many new builds now use these systems.
Common Mistakes to Avoid When Crimping Copper Pipes
Even with the right tool, small mistakes can cause big problems. Being aware of these pitfalls will help you get it right the first time.
Using the Wrong Crimp Ring Size
Crimp rings must match the pipe and fitting size exactly. Using an undersized ring will not compress fully. An oversized ring, on the other hand, can deform the fitting. Always double-check the ring size against the pipe diameter before crimping.
Positioning the Jaws Incorrectly
The jaws must sit squarely over the crimp ring. If they are tilted or off-center, the crimp will be uneven. An uneven crimp can leak over time. Therefore, take a moment to check jaw alignment before squeezing.
Skipping the Inspection Step
Many people skip checking their work after crimping. This is a mistake. Use a go/no-go gauge to verify each crimp. Additionally, always do a pressure test before closing up walls or finishing a project. Catching a problem early is far less expensive than fixing a leak later.
Using a Worn or Damaged Tool
A worn jaw can produce inconsistent results even when used correctly. Inspect your tool regularly for signs of wear. Look for jaw edges that are chipped or rounded. Replace worn jaws promptly to maintain quality crimps.
Top Brands to Consider
Several brands have earned strong reputations in the crimping tool market. Knowing the key players can help you narrow your search.
RIDGID is one of the most trusted names in professional plumbing tools. Their crimping tools are durable, widely compatible, and backed by strong warranties. Milwaukee offers excellent battery-powered options that pair with their broader cordless tool ecosystem. IWISS provides good value for DIYers and light professionals, offering affordable ratcheting tools with solid performance.
Other reputable brands include Viega, which specializes in press-fit plumbing systems, and Uponor, which is well known in the PEX and expansion fitting market. Always verify that a brand’s tool is compatible with the fittings you plan to use.
Price vs. Value: What Should You Spend?
Crimping tools range from around twenty dollars for basic manual models to over one thousand dollars for professional battery-powered units. However, price alone does not determine value.
For a homeowner doing a one-time repair, spending fifty to one hundred dollars on a solid ratcheting tool makes sense. For a plumber doing dozens of joints per day, a three-hundred to five-hundred dollar professional tool pays for itself quickly through speed and reliability.
Consider the long-term cost of a tool. A cheap tool that fails after twenty uses costs more in the long run than a quality tool that lasts for thousands. Additionally, check whether replacement jaws are available and affordable for any model you are considering.
Maintenance Tips to Extend Tool Life
A well-maintained crimping tool will give you reliable results for many years. Follow these simple steps to keep it in top condition.
- Clean the jaws after each use to remove debris and copper shavings.
- Apply a light machine oil to the pivot points every few months.
- Store the tool in a dry place to prevent rust on metal components.
- Inspect the jaws regularly for signs of wear or damage.
- For battery-powered tools, charge the battery fully before long-term storage.
Conclusion
Choosing the right crimping copper pipe tool does not have to be complicated. Start by understanding the three main tool types: manual, ratcheting, and battery-powered. Then focus on the features that matter most, including jaw compatibility, build quality, and crimp standard support.
Match the tool to your project size and budget. A homeowner and a professional plumber have very different needs. Therefore, there is no single best tool for everyone. However, there is a best tool for your specific situation.
Avoid common mistakes like using the wrong ring size or skipping the inspection step. Maintain your tool properly, and it will serve you well for years to come. With the right crimping tool in hand, you can create strong, leak-proof copper pipe connections with confidence every time.
Frequently Asked Questions
1. Can I use a crimping tool on all types of copper pipes?
Most crimping tools are designed for use with Type L and Type M copper pipes, which are the most common in residential plumbing. However, always check the tool’s specifications and confirm it is compatible with the pipe type and wall thickness you are working with. Type K copper, which is thicker, may require a tool rated for that standard.
2. Do I need special fittings to use a crimping tool?
Yes. Crimping tools work with specific press-fit or crimp-style fittings. These are different from standard soldered or compression fittings. Make sure your fittings and your tool follow the same standard, such as ASTM F1807. Using mismatched fittings and tools can result in leaks or joint failure.
3. How do I know if a crimp connection is done correctly?
The best way to verify a crimp is to use a go/no-go gauge. This tool checks that the crimp ring has been compressed to the correct diameter. If the go side fits but the no-go side does not, the crimp is correct. Additionally, always perform a pressure test on the completed system before finishing the installation.
4. Is crimping better than soldering for copper pipes?
Crimping and soldering both create strong, reliable connections when done correctly. Crimping has several practical advantages. It requires no open flame, which makes it safer in confined spaces. It is also faster and easier to learn. However, soldering is still widely used and produces excellent results in the hands of a skilled plumber. Your choice may depend on the job site conditions and your own skill level.
5. Can a beginner use a crimping tool safely?
Yes. Crimping is one of the more beginner-friendly pipe joining methods available. Unlike soldering, it does not involve heat or flux. A ratcheting crimping tool is easy to use and produces consistent results with minimal training. Start with a practice run on scrap pipe and fittings, use a go/no-go gauge to check your work, and you will build confidence quickly.
Related Topics:
Must Have Best Tools for Plumbing Jobs in 2026
A Closer Look at the Sistine Chapel Ceiling: Tools, Techniques, and Timeless Beauty


