
Last summer, I decided to build a custom workbench for my garage. Halfway through, I realized I had misplaced a handful of critical bolts. I spent two hours turning my workspace upside down, only to find them later in a pile of scrap wood. That day taught me a valuable lesson: even the best DIY skills mean little without proper organization.
Understanding bolt nut kit uses can save you from similar frustrations. These kits offer a sorted collection of fasteners, making it easier to find the right piece at the right time. According to a 2023 report by the Home Improvement Research Institute, DIYers who organize their hardware spend 40% less time searching for parts. This small change can turn a chaotic weekend project into a smooth, enjoyable experience.
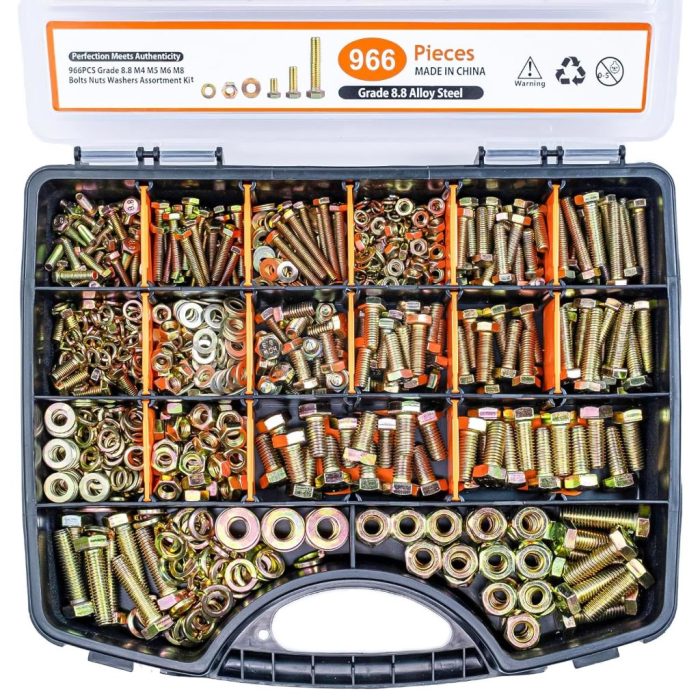
Why Bolt and Nut Assortment Kits Are Essential for DIY Projects
Every DIY enthusiast knows the struggle of starting a project only to realize a critical fastener is missing. Bolt and nut assortment kits solve this problem by providing a wide range of sizes and types in one package. These kits typically include common sizes like M4, M6, and M8 bolts, along with matching nuts and washers. This variety ensures you have the right fastener on hand, whether you are assembling furniture, repairing a bike, or building a deck.
Additionally, these kits save money in the long run. Buying individual bolts and nuts for each project adds up quickly. A well-stocked assortment kit, on the other hand, offers better value and reduces waste. You avoid the hassle of last-minute store runs, which often lead to impulse purchases of tools you do not need. For example, a standard 200-piece kit can cover multiple small to medium projects, making it a cost-effective investment for any homeowner.
Moreover, assortment kits encourage better habits. When you have a dedicated set of fasteners, you are more likely to return unused pieces to their proper place. This discipline prevents the common issue of mixed-up hardware scattered across your workspace. Over time, this approach builds a more efficient and stress-free DIY routine.
Step-by-Step Guide to Organizing Your Bolt and Nut Kit
The first step in organizing your kit is sorting. Begin by emptying the entire contents onto a clean, flat surface. Group bolts, nuts, and washers by size and type. Use a caliper or a bolt gauge to identify sizes accurately. This process might seem tedious, but it pays off when you can grab the exact piece you need without digging through a jumbled mess.
Next, choose a storage system that works for you. Small plastic bins with compartments are ideal for keeping similar items together. Label each section clearly with the size and type of fastener it contains. For instance, use one bin for M6 bolts, another for M6 nuts, and so on. This method ensures you can find what you need at a glance. Additionally, consider using color-coded labels for different materials, such as stainless steel or zinc-plated bolts.
Finally, maintain a simple inventory list. A notebook or a spreadsheet can help you track what you have and what you need to replenish. Update this list every time you use or add to your kit. This habit prevents shortages and ensures you always have the right fasteners for your next project. Over time, you will develop a system that feels intuitive and saves you hours of frustration.
Creative Storage Solutions for Your Assortment
If space is limited, think vertically. Pegboards are a classic solution for garage and workshop organization. Hang small bins or hooks on the board to store your sorted fasteners. This approach keeps your kit visible and accessible while freeing up valuable workbench space. Additionally, pegboards allow you to rearrange your storage as your collection grows.
Another practical option is a tackle box. These boxes are designed with multiple compartments, making them perfect for small hardware. The portable design means you can take your kit to different work areas or even to a friend’s house for a joint project. Look for a box with removable dividers so you can customize the layout to fit your needs.
For a more permanent solution, consider installing a wall-mounted magnetic strip. This is especially useful for metal fasteners, as it keeps them within reach and prevents them from rolling away. Magnetic strips also add a professional touch to your workspace. However, ensure the strip is strong enough to hold the weight of your bolts and nuts securely.
Common Mistakes to Avoid When Using Bolt and Nut Kits
One of the biggest mistakes DIYers make is failing to sort their hardware immediately after purchase. It is tempting to dump everything into a single container and deal with it later. However, this approach leads to confusion and wasted time when you need a specific size. Take the extra 20 minutes to sort and label your kit right away. You will thank yourself later.
Another common error is mixing different materials without labeling them. Stainless steel, zinc-plated, and brass bolts might look similar, but they serve different purposes. Using the wrong material can lead to rust, corrosion, or structural weakness. Always keep materials separate and clearly marked to avoid this issue.
Finally, many people neglect to check their inventory before starting a project. Running out of a critical bolt size mid-project can bring your work to a halt. Before you begin, review your inventory list and ensure you have everything you need. If you are unsure, buy a few extra pieces to be safe. This small step can prevent major delays and keep your project on track.
Tips for Maintaining and Extending the Life of Your Kit
Regular cleaning is essential to keep your kit in top condition. Dust, dirt, and moisture can cause rust and corrosion over time. Wipe down your bolts and nuts with a dry cloth after each use, and store them in a dry, temperature-controlled environment. For added protection, consider using silica gel packets in your storage containers to absorb moisture.
Rust is the enemy of any metal fastener. To prevent it, apply a light coat of oil or a rust inhibitor to your bolts and nuts before storing them. This is especially important if you live in a humid climate. Additionally, inspect your kit every few months for signs of rust or wear. Replace any damaged or corroded pieces to ensure your kit remains reliable.
Lastly, keep your kit organized as you use it. Return each piece to its designated place immediately after use. This habit prevents clutter and makes it easier to find what you need for your next project. It also helps you spot when you are running low on a particular size or type, so you can restock before it becomes a problem.
FAQs
What is the best way to sort bolts and nuts in an assortment kit?
Start by grouping them by type, then by size. Use a bolt gauge or caliper for accuracy. Store each group in a labeled compartment to keep everything organized.
How often should I clean and inspect my bolt and nut kit?
Aim to clean your kit after every major project or at least once every three months. Inspect for rust or damage during each cleaning session.
Can I store bolts and nuts together in the same container?
It is best to keep them separate to avoid confusion. Pairing matching bolts and nuts in the same compartment is fine, but do not mix different sizes or types.
What is the most space-efficient way to store a large assortment kit?
Use a combination of wall-mounted pegboards, magnetic strips, and stackable plastic bins. This approach maximizes vertical space and keeps your workspace tidy.
Are plastic or metal storage containers better for bolt and nut kits?
Plastic containers are lightweight and resistant to rust, making them ideal for most users. Metal containers can be durable but may require extra protection against moisture.
Conclusion
Organizing your DIY projects with a bolt and nut assortment kit is a game-changer. It saves time, reduces stress, and ensures you always have the right fastener on hand. By sorting, labeling, and maintaining your kit, you can transform a cluttered workspace into a model of efficiency.
Start small by sorting your current hardware and investing in a simple storage solution. Over time, you will refine your system to fit your needs perfectly. The key is consistency. Every time you use a bolt or nut, return it to its proper place. This habit will make your DIY projects smoother and more enjoyable.
Now that you have these tips, it is time to put them into action. Share your own organization hacks in the comments below, or pass this guide along to a fellow DIYer who could use the help. Happy building!

