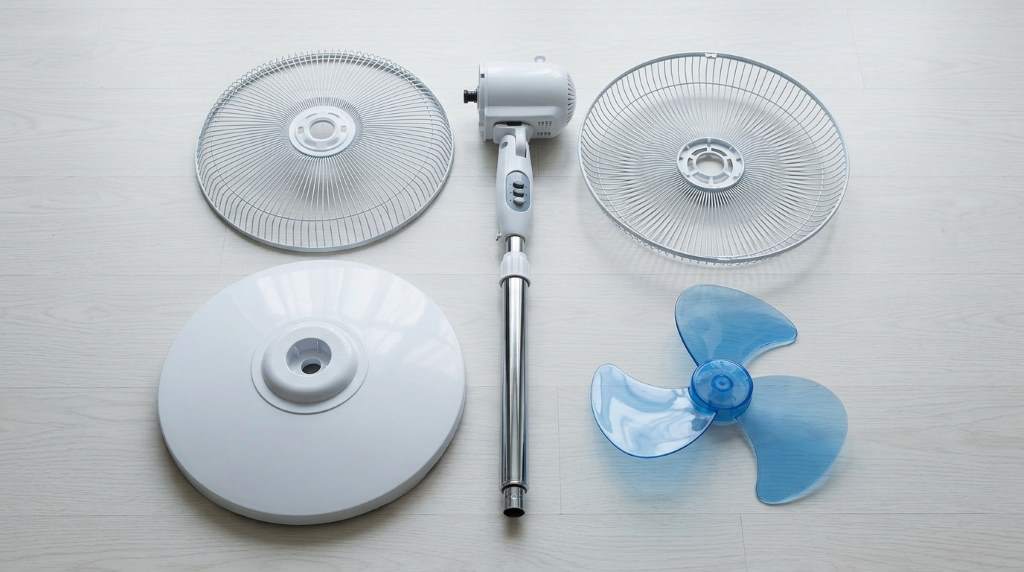
Assembling an oscillating pedestal fan is simple when you follow the correct order and secure every part properly. Start from the base, attach the pole, install the motor housing, mount the blades, and finish with the front grille before testing the oscillation function.
Many households rely on fans for everyday comfort because they use significantly less electricity than air conditioners. Additionally, properly assembled Oscillating pedestal fans provide better airflow, quieter operation, and improved safety. This guide explains every assembly step using simple instructions, practical tips, and common troubleshooting advice. Each section helps you complete the installation confidently while avoiding common mistakes.
Why Proper Assembly Matters
Correct assembly improves airflow and keeps every moving part stable during operation. It also reduces vibration, unwanted noise, and unnecessary wear on important components.
Proper installation also protects the motor and fan blades from damage. Therefore, taking a few extra minutes during assembly improves long term performance.
Tools and Parts You Need
Most pedestal fans include everything required for assembly inside the package. However, checking every component before starting prevents unnecessary interruptions.
- Fan base
- Extension pole
- Height adjustment collar
- Motor housing
- Rear grille
- Fan blade
- Blade cap
- Front grille
- Grille locking ring or clips
- Fasteners and screws
- User manual
You may also need a Phillips screwdriver depending on the fan model. Meanwhile, a soft cloth helps remove packaging dust before installation.
Prepare the Assembly Area
Select a clean, flat surface with enough room for every component. Good lighting also helps you identify matching screws and locking tabs.
Keep children and pets away from the workspace during assembly. Likewise, organize the small hardware inside a tray to prevent missing parts.
Step by Step Guide to Assemble an Oscillating Pedestal Fan
Step 1: Assemble the Base
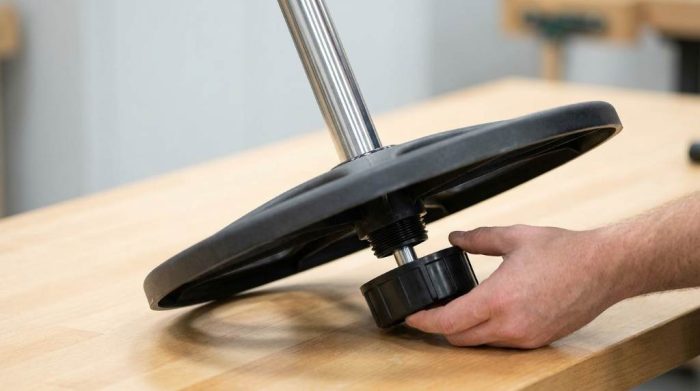
Place the base on a stable floor before attaching the support pole. Most bases use a locking nut underneath for secure installation.
Tighten every connection firmly without using excessive force. Consequently, the fan remains balanced during operation.
Step 2: Install the Extension Pole
Insert the extension pole into the base according to the manufacturer’s design. Next, tighten the adjustment collar to secure the pole.
Check that the pole stands perfectly upright before moving forward. This simple inspection prevents future wobbling.
Step 3: Attach the Motor Housing
Lift the motor assembly carefully and slide it onto the top of the extension pole. Afterward, tighten the mounting knob completely.
Hold the motor with both hands while securing it into position. This method prevents accidental dropping during installation.
Step 4: Install the Rear Grille
Remove the grille locking nut from the motor shaft before positioning the rear grille. Align the guide tabs carefully for a proper fit.
Replace the locking nut after positioning the grille correctly. Then tighten it until the grille feels completely secure.
Step 5: Mount the Fan Blade
Slide the fan blade gently onto the motor shaft until it sits fully in place. Match the flat section or groove if your model includes one.
Install the blade cap by turning it according to the manual instructions. Always confirm that the blade spins freely afterward.
Step 6: Attach the Front Grille
Position the front grille over the rear grille while matching the alignment marks. Secure both grilles using the clips or locking ring.
Inspect every clip before completing this step. Properly secured grilles improve safety during operation.
Step 7: Adjust the Fan Height
Loosen the height adjustment collar before raising or lowering the extension pole. Afterwards, tighten the collar securely.
Select a height that directs airflow toward the occupied area. This adjustment improves cooling efficiency throughout the room.
Step 8: Test the Oscillation Function
Plug the fan into a suitable electrical outlet before switching it on. Press the oscillation knob to verify smooth side to side movement.
Watch the fan for several minutes during the first test. Everything should operate quietly without unusual movement or vibration.
Common Assembly Mistakes to Avoid
Small mistakes often cause unnecessary performance issues after assembly. Fortunately, most problems have simple solutions.
- Skipping the instruction manual
- Installing the blade backward
- Leaving grille clips unsecured
- Overtightening plastic fasteners
- Using incorrect replacement parts
- Ignoring loose mounting screws
Safety Tips During Assembly
Always assemble the fan while it remains unplugged from electricity. This simple habit eliminates accidental startup during installation.
Never operate the fan without both protective grilles installed. Furthermore, inspect every fastener before the first use.
- Read the manual completely
- Keep fingers away from moving blades
- Place the fan on a level surface
- Inspect damaged power cords immediately
- Store unused hardware safely
Maintenance After Assembly
Routine maintenance keeps your pedestal fan operating efficiently for many years. Regular cleaning also improves airflow and reduces dust buildup.
Wipe the fan blades with a soft cloth every few weeks. Likewise, tighten visible screws whenever you notice slight vibration.
- Clean the grilles regularly
- Remove dust from the motor housing
- Inspect the power cord frequently
- Store indoors during long periods of nonuse
- Replace damaged blades immediately
Troubleshooting After Assembly
The Fan Wobbles
Check that the base, pole, and motor housing remain tightly connected. Loose fasteners usually create unwanted movement.
The Blades Do Not Spin Properly
Inspect the blade installation and confirm the locking cap remains secure. Also verify that nothing touches the blades.
The Oscillation Stops
Ensure the oscillation knob sits fully engaged during operation. If necessary, inspect the mechanism according to the manual.
The Fan Makes Noise
Look for loose screws, grille contact, or improperly seated blades. Tightening the affected part often solves the issue immediately.
Conclusion
Learning how to assemble oscillating pedestal fans becomes much easier when each step follows the correct sequence. Careful installation improves safety, airflow, and long term performance with minimal effort.
Follow these instructions carefully before using your fan for the first time. Finally, inspect every connection regularly and enjoy reliable cooling throughout the year.
Frequently Asked Questions
Can I assemble a pedestal fan without tools?
Yes, many models only require hand tightening while some need a simple screwdriver.
How long does assembly usually take?
Most people complete assembly within 20 to 30 minutes.
Should I lubricate the motor during assembly?
No, most modern pedestal fan motors come permanently lubricated.
Why is my newly assembled fan vibrating?
Loose screws or an incorrectly installed blade usually cause vibration.
Can I test the fan before attaching the front grille?
No, always install both protective grilles before operating the fan.