You operate this heater by connecting a 20-pound propane tank and slowly opening the cylinder valve. Next, push and turn the control knob to Pilot while pressing the electronic ignition button. Once the burner lights, hold the knob for thirty seconds to establish a steady warming flame.
Cold evenings often cut outdoor patio gatherings short during late autumn and early spring months. Fortunately, the Amazon Basics propane patio heater generates 46,000 BTUs across a nine-foot radius. In fact, field tests reveal that radiant heat raises outdoor comfort by fifteen degrees Fahrenheit. Therefore, this comprehensive guide explains safe setup, quick ignition techniques, and practical maintenance tips.
Key Takeaways
- Always open the propane cylinder valve slowly to prevent triggering the safety leak limiter.
- Purge trapped air from the gas hose before clicking the electronic igniter button.
- Check the pulse igniter cap to ensure the AAA battery faces positive outward.
- Hold the control knob inward for thirty seconds to warm the safety thermocouple.
- Shut off the propane tank valve first to burn out remaining hose pressure.
- Maintain three feet of clearance around the aluminum reflector shield at all times.
Essential Safety Clearances and Stability Setup
Outdoor patio heaters demand plenty of open air to disperse combustion byproducts safely. Specifically, you must operate this heating unit only in well-ventilated outdoor spaces. Never place the running heater inside enclosed porches, tents, garages, or covered breezeways.
Proper overhead and lateral clearances protect surrounding patio structures from intense radiant heat. Maintain at least three feet of space between the top reflector and any ceiling. Additionally, keep twenty-four inches of clearance between the burner shield and nearby walls. Keep combustible furniture, patio cushions, umbrella fabrics, and tree branches well beyond this perimeter.
Strong wind gusts can tip tall outdoor heaters and cause dangerous property damage. Therefore, fill the weighted base reservoir with dry sandbox sand or clean water. In freezing winter conditions, add non-toxic plumbing antifreeze to the water reservoir immediately. Secure the base brackets to patio pavers using heavy-duty anchoring bolts whenever possible.
Inspecting the Electronic Pulse Igniter
The Amazon Basics heater relies on an electronic pulse igniter to generate sparks. First, unscrew the black ignition button cap by turning it counterclockwise with your fingers. Insert one fresh AAA alkaline battery inside the chamber with positive terminal facing outward. Then, screw the rubberized cap clockwise until you feel firm resistance against the threads.
Always test the electronic igniter before connecting your pressurized fuel cylinder. Press the button firmly and listen for a rapid, crisp clicking sound near the burner. If the igniter remains silent, recheck the battery polarity or install a fresh battery. Furthermore, inspect the small ceramic electrode wire to confirm clean electrical alignment.
Connecting and Bleeding the Propane Tank
You must utilize a standard twenty-pound liquid propane tank featuring an approved OPD safety valve. Carefully inspect the cylinder collar, pressure valve, and rubber foot ring for visible dents. Never connect rusted tanks or cylinders displaying damaged connector threads to your patio heater.
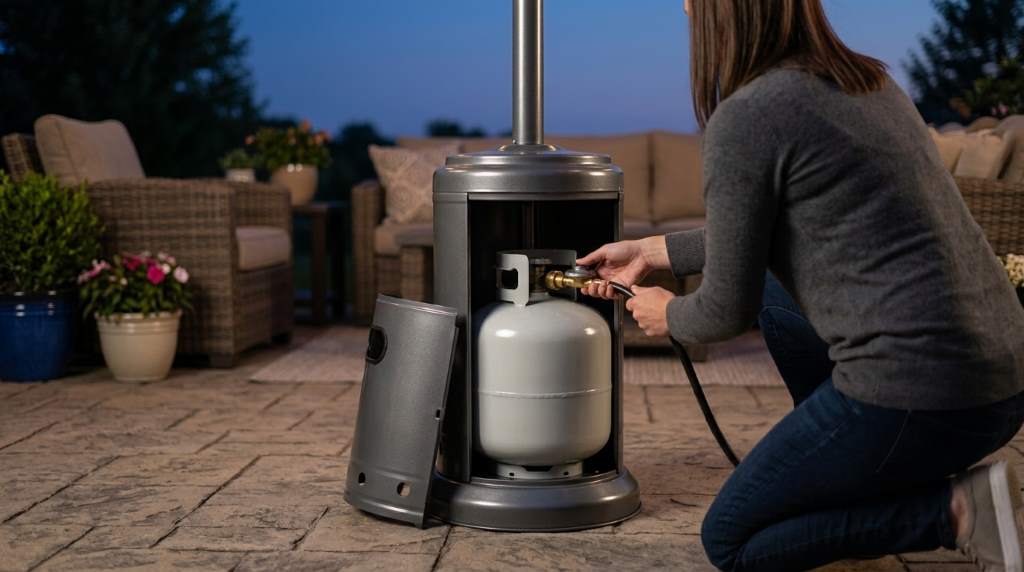
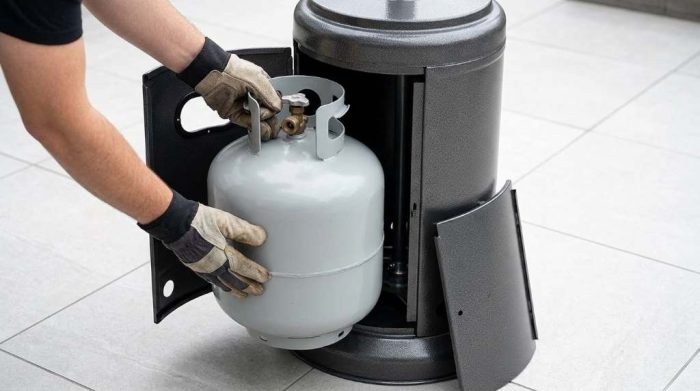
Slide the cylinder housing upward and set your full propane tank onto the lower base. Next, secure the tank strap tightly around the cylinder body to eliminate unwanted movement. Align the regulator hose assembly with the cylinder valve opening without twisting the flexible line. Tighten the black plastic coupling nut clockwise by hand until you achieve a snug fit.
Leak detection prevents dangerous fuel vapor accumulation around the lower base compartment. Mix equal parts liquid dish soap and warm tap water in a small spray bottle. Next, spray the soapy solution generously over all hose fittings and valve connections. Watch closely for expanding soap bubbles, which indicate an active gas leak requiring immediate tightening.
New tanks or freshly connected hoses consistently trap stagnant air within the gas line. Consequently, trapped air prevents fresh propane from reaching the pilot burner nozzle promptly. You must purge this air before attempting to click the ignition button repeatedly. Push the variable control knob inward at the Pilot position for forty-five seconds continuously.
Step-by-Step Lighting Instructions
Begin ignition by rotating the cylinder handwheel counterclockwise very slowly to open gas flow. Rapid valve rotation trips the internal excess flow safety ball and restricts fuel delivery. Therefore, take five full seconds to rotate the tank handwheel into its fully open position.
Locate the primary control knob positioned beneath the upper emitter screen assembly. Turn the dial to the Off position before initiating the formal lighting sequence. Next, push the dial inward firmly and turn it counterclockwise toward the Pilot mark.
Hold the control knob down while pressing the pulse igniter button repeatedly. You will see a small blue flame appear inside the pilot viewing aperture. Continue holding the knob depressed for thirty seconds to warm the copper thermocouple sensor. Release the knob gently and confirm that the small blue pilot flame remains burning steadily.
After establishing a steady pilot flame, turn the dial counterclockwise toward High. The main perforated burner screen will ignite instantly with a soft whoosh sound. Adjust the dial anywhere between Low and High to suit your outdoor heating preferences. Soon, the heavy aluminum reflector canopy will direct pleasant downward warmth across your patio space.
Proper Shutdown and Storage Procedure
Safe shutdown requires shutting down the fuel supply in a very specific order. First, turn the valve handwheel on the propane cylinder clockwise until it seals completely. Allow the burner to consume all remaining propane trapped inside the supply line. This vital habit prevents dangerous residual gas pressure from locking the regulator diaphragm.
Once the flame extinguishes naturally, push and rotate the heater control knob to Off. Let the aluminum dome and burner mesh cool for at least thirty minutes untouched. Touching the top reflector canopy prematurely can cause severe accidental skin burns.
After the metal cools completely, drape a waterproof, UV-resistant cover over the entire unit. High winds and autumn storms can blow dust into the delicate burner orifice. Store the detached propane cylinder upright in an exterior shaded location away from heat sources.
Technical Specifications and Heating Output
Understanding technical capabilities helps you optimize fuel economy during cold evening gatherings. For example, ambient air temperature and local wind speed directly influence overall heating efficiency. The following table outlines essential technical metrics, operating dimensions, and practical field advice.
| Specification Feature | Performance Rating | Practical Operation Tip |
|---|---|---|
| Maximum Heat Output | 46,000 BTUs per hour | Use high setting for initial warmup then reduce heat. |
| Heating Coverage Radius | 9-foot radius circle | Position patio seating evenly within the radiant circle. |
| Fuel Tank Compatibility | Standard 20-lb LP cylinder | Inspect the tank collar and expiration date before use. |
| Burn Time per Tank | 9 to 10 hours on high | Lower the control setting to extend run time considerably. |
| Ignition Mechanism | Electronic pulse igniter | Replace the internal AAA battery every autumn season. |
| Safety Shut-Off Features | Tilt sensor and thermocouple | Never bypass the tilt sensor switch during windy conditions. |
Operating your heater on the medium setting extends fuel longevity up to twelve hours. Consequently, you save significant propane costs while preserving pleasant outdoor comfort for everyone. Always balance warmth demand against prevailing wind conditions to maximize your patio investment.
Troubleshooting Common Operating Problems
Fixing Weak Flames Caused by Regulator Lock
A weak, flickering flame often signals a tripped excess flow safety valve inside the regulator. This condition happens when you open the propane tank valve too rapidly during startup. Fortunately, you can reset this automatic safety bypass mechanism in just two minutes.
First, turn the heater dial and the propane cylinder valve to complete Off positions. Disconnect the regulator coupling nut from the cylinder threads to bleed line pressure fully. Then, reattach the coupling nut and open the propane handwheel very slowly. This simple reset process clears trapped pressure and restores full 46,000 BTU thermal capacity.
Resolving Sudden Burner Blowouts and Flame Loss
Sudden wind gusts occasionally blow out the pilot flame during brisk autumn evenings. In response, the internal safety thermocouple cools rapidly and cuts off all gas flow. This critical mechanism prevents raw, flammable gas from escaping into your outdoor entertainment zone.
Wait five full minutes before attempting to relight the burner after an unexpected blowout. Meanwhile, reposition your patio heater toward a sheltered corner or install a protective windbreak. Clean any oxidation debris off the copper thermocouple tip using fine-grit sandpaper gently. A clean thermocouple transfers electrical millivolts efficiently and keeps the fuel valve open reliably.
Clearing Spider Webs from Venturi Tubes
Insects and small garden spiders frequently nest inside dark heater burner tubes during storage. Consequently, tiny silk webs obstruct fuel flow and cause noisy, yellow, sooty flames. Yellow flames produce excessive carbon soot and reduce overall radiant heating performance dramatically.
Disassemble the upper emitter screen carefully to inspect the burner tube air intakes. Use a flexible pipe cleaner or compressed air canister to clear out obstructions. Reassemble the components securely and inspect the resulting flame through the viewing port. A healthy burner flame displays a distinct blue core with soft orange tips.
Routine Maintenance for Reliable Seasonal Performance
Regular maintenance guarantees smooth operation whenever cold temperatures arrive on your deck. First, inspect the rubber fuel hose monthly for dry rot, stiffness, or abrasions. Replace any compromised hose immediately to eliminate fire hazards on your outdoor patio.
Clean the top aluminum reflector shield using mild car wash soap and microfiber towels. Polishing away atmospheric grime allows the dome to bounce radiant heat downward with maximum power. Never use abrasive scouring pads or corrosive chemical cleaners on the reflective aluminum surface.
Furthermore, tighten all structural pole bolts and base fasteners at least twice each season. Periodic thermal expansion and brisk winds loosen hardware over prolonged outdoor exposure cycles. Applying silicone spray to the wheel axle ensures smooth transportation across uneven patio surfaces.
Conclusion: Maximize Your Outdoor Living Space
Operating this outdoor heater safely unlocks comfortable year-round entertaining on your backyard deck. Following proper lighting sequences, gas purging steps, and clearance guidelines prevents common startup frustrations. In addition, routine battery checks and burner cleanings maintain peak 46,000 BTU heating capacity.
Do not let brisk autumn evenings drive your family and guests indoors early. Inspect your propane fittings, start up your heater, and enjoy reliable radiant warmth tonight!
Frequently Asked Questions
Why is my Amazon Basics patio heater not lighting?
Most ignition failures stem from air in the line or an inverted AAA igniter battery.
How long does a 20-pound propane tank last on this heater?
A full 20-pound propane cylinder provides nine to ten hours of continuous heat on High.
Can I use this propane patio heater under a covered patio?
No, you must maintain at least three feet of open overhead clearance above the reflector.
Why does my patio heater produce a small, weak flame?
A tripped excess flow safety valve restricts gas when you open the tank too fast.
How do I protect my patio heater from tipping over in high winds?
Fill the base reservoir with sand and anchor the bottom brackets to your patio pavers.
Image ALT Text Suggestions:
- Connecting propane regulator valve to Amazon Basics patio heater cylinder
- Depressing control knob to ignite Amazon Basics patio heater pilot flame
- Amazon Basics propane patio heater warming outdoor backyard patio table
- Adjusting heat control dial on Amazon Basics outdoor propane heater